Very often there is a need to quickly and efficiently assemble an Internet of Things device and connect it to the cloud infrastructure. Let's look at the construction of such a necessary device to monitor the parameters of CO2, temperature, humidity, and pressure in the room. This can now be easily done, for example, on the ESP8266 and Thingspeak, by connecting a pair of sensors and writing small program code.
What is IoT?
Internet of Things, IoT is a network concept consisting of interconnected physical devices with encoders, as well as software that enables the transmission and exchange of data between the physical world and computer systems using standard communication protocols.
In addition to sensors, the network can have actuators built into physical objects and connected through wired or wireless networks. These interconnected devices have the ability to read and actuate the programming and identification function and also eliminate the need for human involvement through the use of intelligent interfaces.
The Internet of Things can now solve very important tasks, both in the application of everyday management of various devices and in business and production.
ESP8266 as a basic module for IoT homebrew
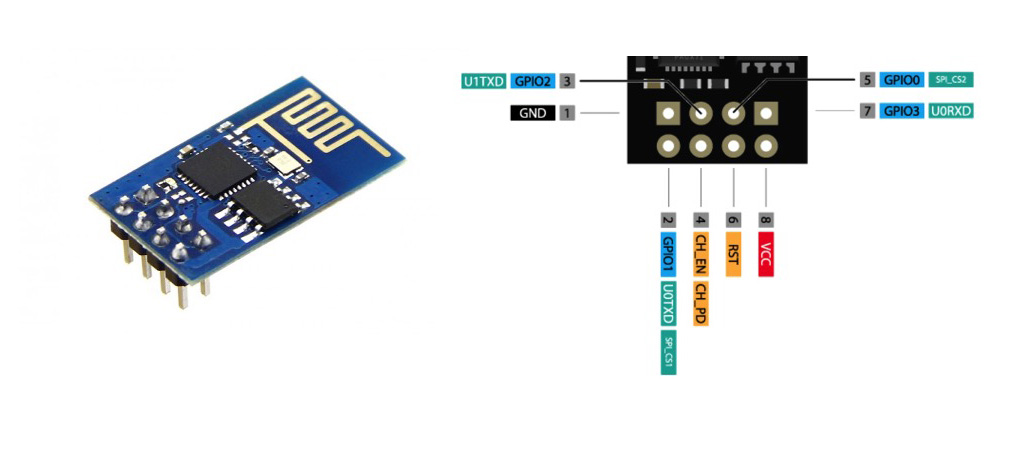
ESP8266 is a microcontroller developed in 2014 and manufactured by Espressif Systems, a Chinese company in Shanghai. It is a network solution with a Wi-Fi transceiver onboard plus the ability to run applications recorded in its memory. It is ideal for the manufacture of various Internet of Things devices in view of its functionality and low cost.
ESP8266 Specification:
Supply voltage: 3.3 V Power Consumption: 10 μA ... 170 mA Flash memory: up to 16 mb maximum (usually 512 kb) Processor: Tensilica L106, 32 bits CPU speed: 80 ... 160 MHz RAM: 32 kb + 80 kb General Purpose I/O Ports: 17 (multiplexed with other functions) ADC: 1 input with a resolution of 1024 802.11 Support: b/g/n/d/e/i/k/r Maximum TCP Connections: 5
IoT circuit for temperature, humidity, pressure, CO2 sensor
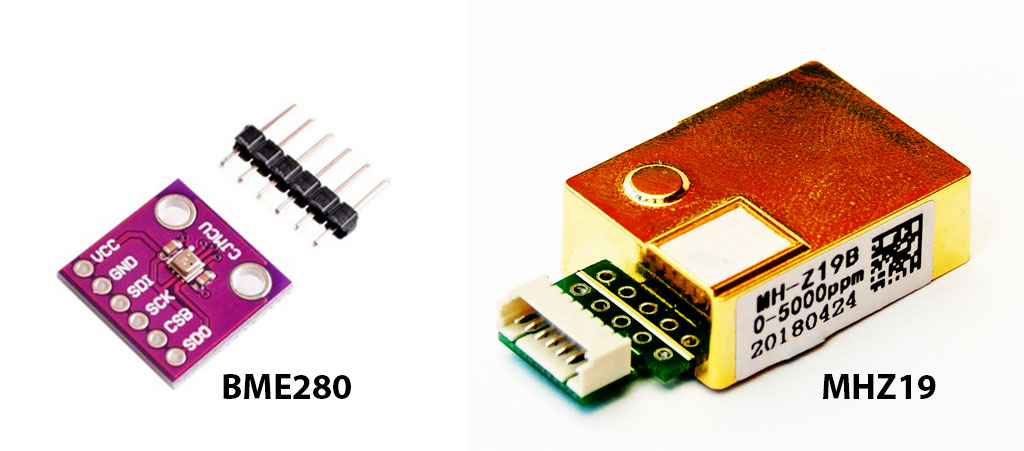
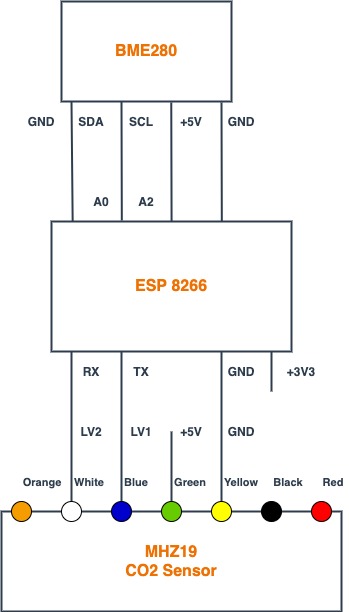
Connect two sensors to the ESP8266. The first is the MHZ-19 for measuring CO2. it is connected via the serial port. Connect it to the corresponding RX, TX pins on the ESP8266.
But the BME280 sensor (temperature, pressure, humidity) is connected via the I2C port. And we will connect it to A0, A2 on the ESP8266, which we will use as an I2C interface. Thus, we can increase the number of sensors on this connection, since this bus allows you to address in parallel up to 50 devices by ID.
Wiring diagram for sensors to the ESP8266.
In the corresponding sketch, we will connect libraries for working with BME280 and MHZ19 sensors. There is no need to create code for sensors from scratch. There are enough examples on the Internet to work with these sensors and a very good explanation of connecting Thingspeak cloud.
Esp8266_ts.ino
#include "ThingSpeak.h"#include "secrets.h"#include <ESP8266WiFi.h>#include <Adafruit_BME280.h>#include <SoftwareSerial.h> #include "MHZ19.h"#define RX_PIN 3 // Rx pin which the MHZ19 Tx pin is attached to#define TX_PIN 1 // Tx pin which the MHZ19 Rx pin is attached to#define BAUDRATE 9600 // Device to MH-Z19 Serial baudrate (should not be changed)
MHZ19 myMHZ19;
Adafruit_BME280 bme; // use I2C interface
Adafruit_Sensor *bme_temp = bme.getTemperatureSensor();
Adafruit_Sensor *bme_pressure = bme.getPressureSensor();
Adafruit_Sensor *bme_humidity = bme.getHumiditySensor();
sensors_event_t temp_event, pressure_event, humidity_event;
char ssid[] = SECRET_SSID; // your network SSID (name)
char pass[] = SECRET_PASS; // your network password
int keyIndex = 0; // your network key Index number WiFiClient client;
unsigned long myChannelNumber = SECRET_CH_ID;
const char * myWriteAPIKey = SECRET_WRITE_APIKEY;
SoftwareSerial mySerial(RX_PIN, TX_PIN);
void setup() {
Serial.begin(115200); // Initialize serial
Wire.begin(2, 0); // I2C for ESP8266
mySerial.begin(BAUDRATE); // (Uno example) device to MH-Z19 serial start
myMHZ19.begin(mySerial); // *Serial(Stream) refence must be passed to library begin().
myMHZ19.autoCalibration();
if (!bme.begin(BME280_ADDRESS_ALTERNATE)) {
Serial.println(F("Could not find a valid BME280 sensor, check wiring!"));
while (1) delay(10);
}
bme_temp->printSensorDetails();
bme_pressure->printSensorDetails();
bme_humidity->printSensorDetails();
WiFi.mode(WIFI_STA);
ThingSpeak.begin(client); // Initialize ThingSpeak
}
void loop() {
if(WiFi.status() != WL_CONNECTED){ // Connect or reconnect to WiFi
Serial.print("Attempting to connect to SSID: ");
Serial.println(SECRET_SSID);
while(WiFi.status() != WL_CONNECTED){
WiFi.begin(ssid, pass); // Connect to WPA/WPA2 network.
Serial.print(".");
delay(5000);
}
Serial.println("\nConnected.");
}
int temperature = bme.readTemperature();
int humidity = bme.readHumidity();
int pressure = bme.readPressure() / 100.0F;
int CO2 = myMHZ19.getCO2();
// Write to ThingSpeak.
ThingSpeak.setField(1, temperature);
ThingSpeak.setField(2, humidity);
ThingSpeak.setField(3, pressure);
ThingSpeak.setField(4, CO2);
if(ThingSpeak.writeFields(myChannelNumber, myWriteAPIKey) == 200)
Serial.println("Channel update successful.");
else
Serial.println("Problem updating channel. HTTP error code " + String(x));
delay(60000); // Wait 60 seconds to update the channel again
}
secret.h
#define SECRET_SSID "MySSID" // replace MySSID with your WiFi network name#define SECRET_PASS "MyPassword" // replace MyPassword with your WiFi password#define SECRET_CH_ID 0000000 // replace 0000000 with your channel number#define SECRET_WRITE_APIKEY "XYZ" // replace XYZ with your channel write API KeyCode language:PHP(php)
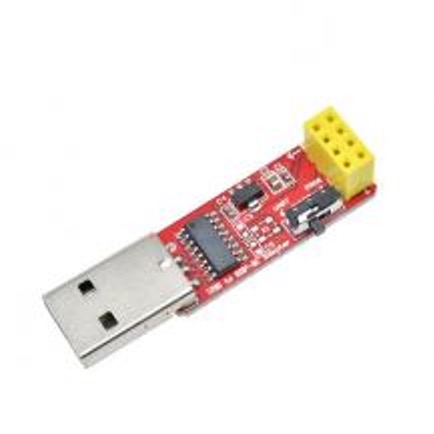
To write a sketch to ESP8266 memory, you can use a programmer based on the CH340G chip, for example, as shown in the figure and the Arduino development environment.
CH340G programming board for ESP8266
Building Thingspeak backend
As we wrote in a previous article, you can now build a backend for the Internet of Things in the cloud. We use a free account on ThingSpeak, which is very well suited for this purpose.
Internet of Things Development Services for Connected SuccessTransform your business with Svitla Systems’ advanced IoT development expertise and tailored solutions.Get a Consultation
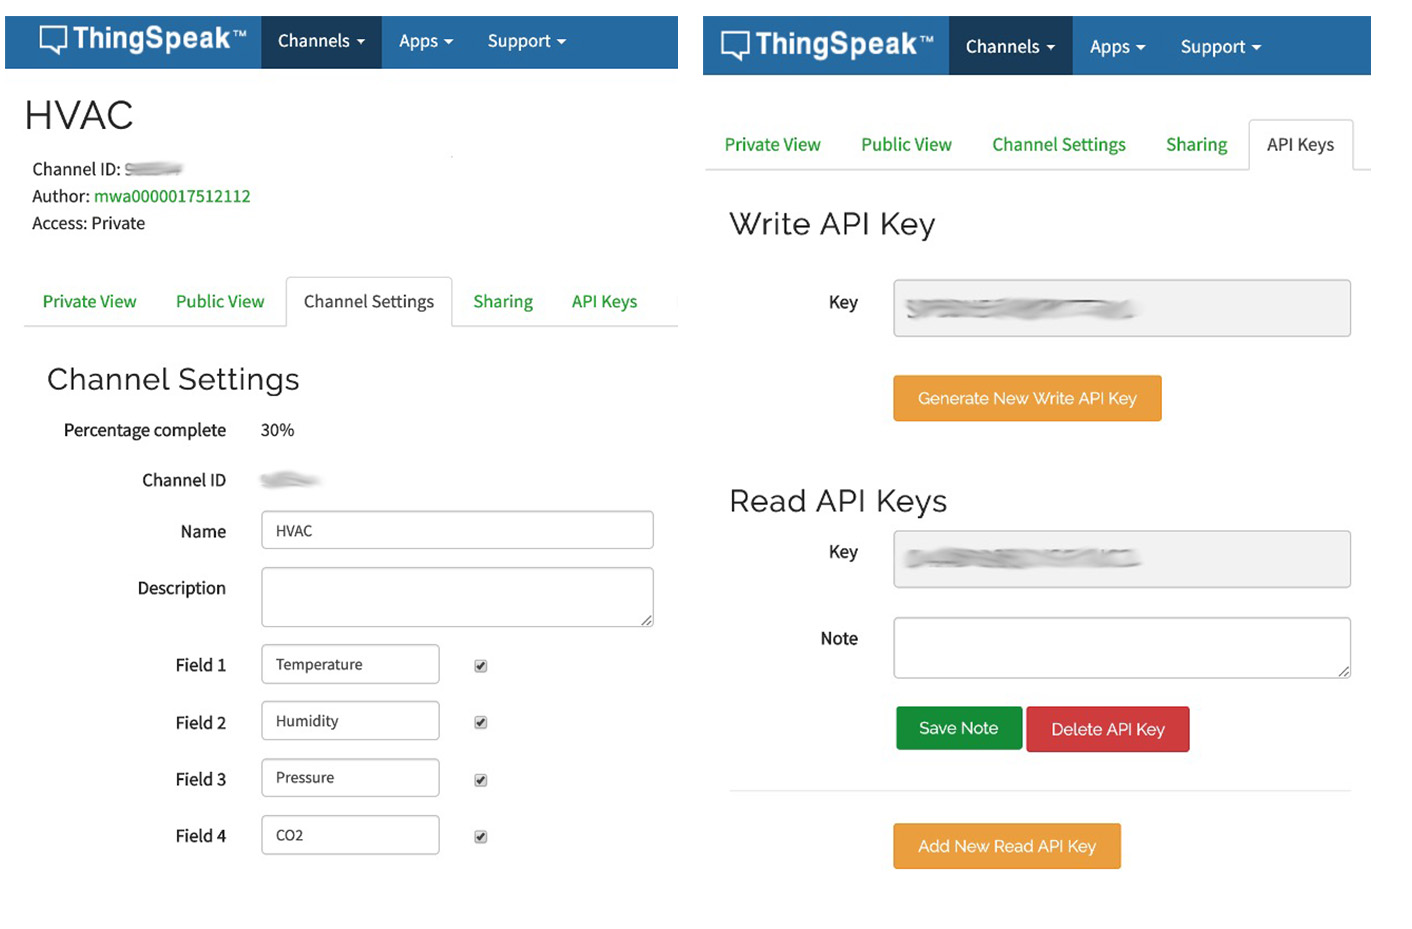
To do this, you need to register on their service, get the channel code, and the secret key. We enter the secret key and access to WiFi in the sketch file secret.h.
We configured 4 parameters (Field1-Field4) in the channel using the admin panel in the browser for temperature, humidity, pressure, and CO2.
Testing IoT device
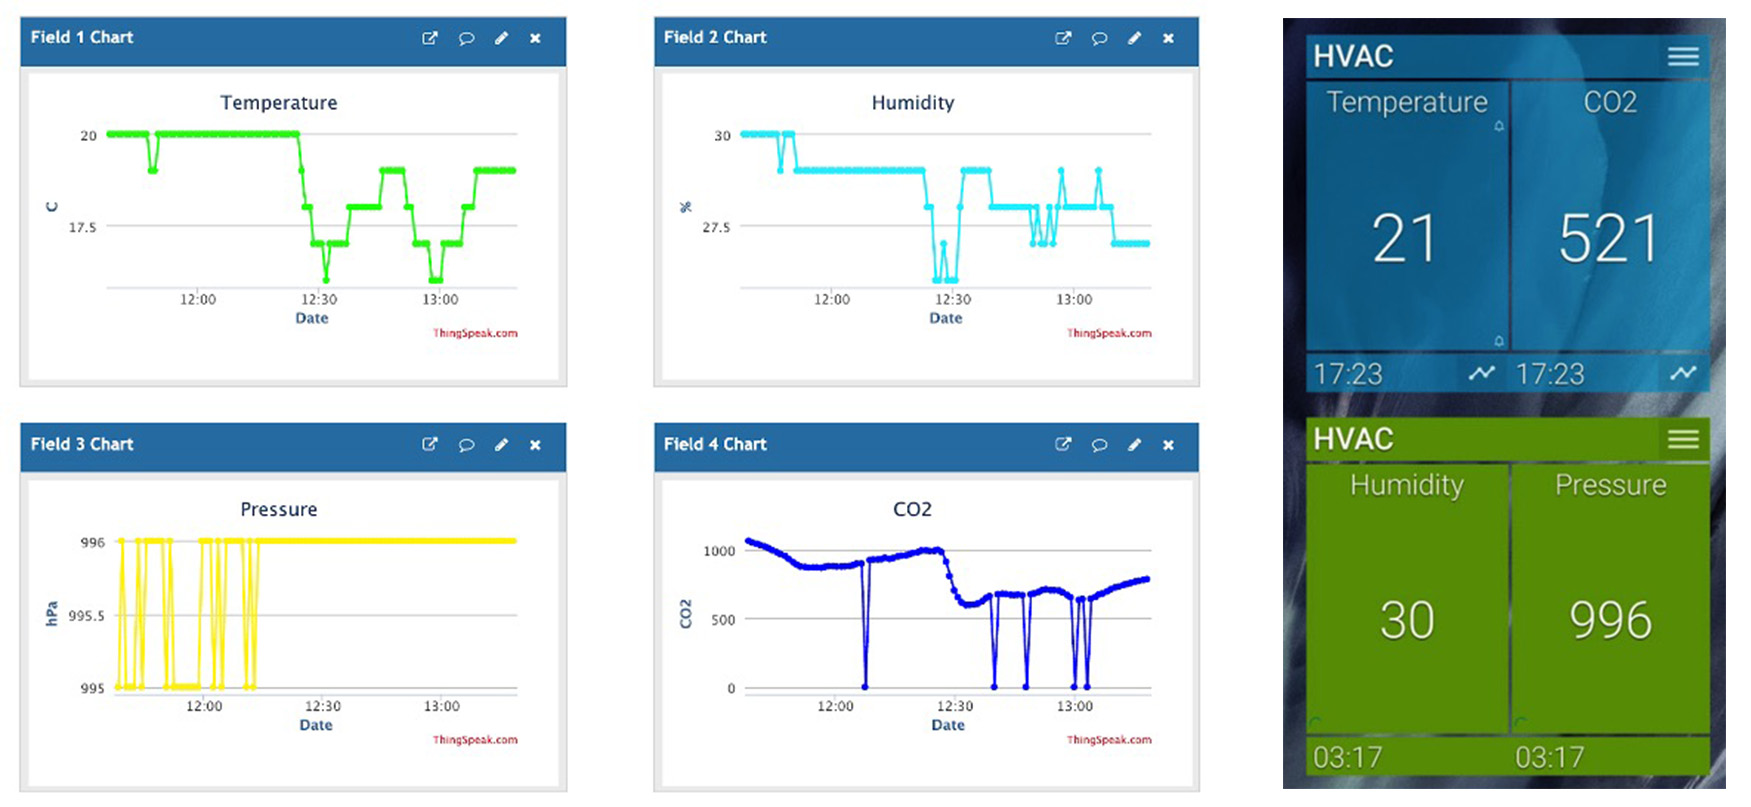
And now in the browser, we open the parameters and see what air is in the room. To do this, you can add graphs for each parameter and set the amount of data displayed. You can establish both private and public access to this data. Interestingly, ThingSpeak immediately makes it possible to load this data into Matlab for analysis.
But the browser is not always at hand if you want to operate the system at home. To track the parameters of the air in the room, we put widgets on Android and look at the parameters on the phone. You will find a lot of these widgets in PlayMarket. Here is one of them, tested and working. In the widget, you can observe the necessary channels from the sensors, set a warning threshold, and update values.
Conclusion
As it turned out, to build a fully functional and practical Internet of Things device, you just need a little ESP8266 and several sensors, and free backend for ThingSpeak. This example illustrates how easy it is now to organize work with the Internet of Things. In this case, you do not need to have any special knowledge in electronics, circuitry, or programming. There are a lot of examples of sketches for controllers like ESP8266 on the Internet. There is also a huge number of ready-made devices to which you can connect the necessary sensors or controlled devices.
Our experts have extensive experience in building backends and complex systems of the Internet of Things. We apply this experience in projects for our customers. Svitla Systems always provides the best solutions on the market and carries out each project very carefully, conducts the necessary testing cycles, helps with project support, and supports it in cloud systems. We develop software for the Internet of Things and the necessary infrastructure and will always help you solve your problems.
Written by
Svitla Team
FAQ
What is an IoT backend?
An IoT backend is the infrastructure, often cloud-based, that supports Internet of Things devices by facilitating data transmission and exchange between physical devices and computer systems. It enables users to monitor various parameters, set alert thresholds, and analyze data using tools like Matlab. This makes it easier to manage and derive insights from the data generated by IoT devices.
What is the best language for IoT backend?
While there isn’t a single “best” language for an IoT backend, several are commonly used. Languages like Python, Java, and Node.js are popular due to their versatility and extensive libraries supporting IoT development. Ultimately, the best language depends on the project’s specific requirements, including scalability, performance, and integration with other systems.
What does an IoT developer do?
An IoT developer connects physical devices to networks and cloud platforms, enabling data collection and remote control. Their tasks include programming embedded systems, integrating sensors and actuators, and building software to process and visualize data. They often work with microcontrollers, communication protocols, and cloud services to create complete IoT solutions.
What are end devices in IoT?
End devices in IoT are the physical objects equipped with sensors and actuators that interact with the environment and collect data. These devices, such as sensors measuring temperature or humidity, connect to a network to transmit data to a central system for processing and analysis. They form the “things” in the Internet of Things, enabling real-time monitoring and control of various parameters.