
Since the very appearance of the concept of the World Wide Web network in 1991, Tim Berns-Lee came up with the idea of an interactive hypertext exchange of user information with an information system. Also, the idea of using the uniform resource locator, HTTP and HTML came to life. What’s more, the system that was developed and CSS began to be used to format pages. Soon, JavaScript came into the scene to run the program code on the client side, which was run in the browser. This made it possible to solve a lot of problems related to user interaction with a page on the World Wide Web. Every year, the need to create more and more advanced information systems online has increased and, accordingly, the requirements for the user interface on the page in the browser have increased as well. The AJAX approach (Asynchronous JavaScript And XML) played a significant role. This is an approach to building user interfaces of web applications, in which the web page, without reloading, sends requests to the server in the background and from there, it loads the necessary user data. For the record, AJAX is one of the components of the DHTML concept.
Using these approaches allows you to create much more user-friendly web interfaces on those pages of sites where active interaction with the user is required. AJAX is asynchronous, so the user can continue to view site content while the server is still processing the request. The browser does not reload the web-page, and the data is sent to the server without visual confirmation (except when we ourselves want to show the process of connecting to the server). Moreover, there was an urgent need to implement web applications with a large amount of input and output information, which increased requirements for the UI/UX user interface. Many companies and development teams have tried to create a versatile and powerful tool for fast, high-quality JavaScript interface development. This is how Angular and React appeared; then, VueJS along with other libraries and frameworks.
Since 2015, React has positioned itself as an open JavaScript library to create user interfaces in the web application development environment. React is designed to solve the issues of partial content updates for web pages, which can be found in the development of one-page applications. A contributing factor to its popularity and reliability is the fact that React is developed by Facebook, Instagram, and a community of individual developers. Among other things, React also allows you to write cross-platform applications for mobile devices, as part of a separate React Native project (keep on reading for more information about this in an upcoming section). Worth mentioning is the fact that React does not attempt to provide a complete “application scheme.” In contrast, it’s directly aimed at building user interfaces and thus, it does not include many tools that some developers consider necessary to create a program. You can select the library of your preference to perform specific tasks, like accessing the network or storing data locally.
Installation NodeJS and React
To get you all set up and meet the prerequisites to start developing web applications with React on macOS, you can use brew’s set of excellent tools. First, you’ll need to install NodeJS to run the application and npm packages. For now, update the brew database:
brew update
Then, you’ll need to install NodeJS, since without it, nothing will start. Get yourself a cup of coffee while you wait for the package to be downloaded, it shouldn’t take long.
brew install node
==> Downloading https://ghcr.io/v2/homebrew/core/node/manifests/16.1.0
…
==> Summary
🍺 /usr/local/Cellar/node/16.1.0: 2,778 files, 48.9MB
After installation, you’ll be able to see which version of NodeJS is installed and what its current status is:
brew info node

node: stable 16.1.0 (bottled), HEAD
...
install: 383,068 (30 days), 1,184,182 (90 days), 4,405,612 (365 days)
install-on-request: 300,106 (30 days), 921,177 (90 days), 3,287,981 (365 days)
build-error: 0 (30 days)
Code language: CSS (css)
Great, NodeJS is installed and ready to go! Use the create-react-app package to create the starter code for a React web app. To do this, you need to install it using npm:
npm install -g create-react-app
Now, you’ll need to create the initial application code, where react_project is the name of the project:
create-react-app react_project
You’ll get the following result:
Creating a new React app in /Users/.../react_app/react_project.

Installing packages.
...
We suggest that you begin by typing:

  cd react_project
  npm start

Happy hacking!
Code language: JavaScript (javascript)
Next, start the project from react_project catalog:
cd react_project
npm start
We will receive the following message about the successful launch of the project:
Compiled successfully!
You can now view react_project in the browser.
Local: http://localhost:3000
On Your Network: http://192.168.1.85:3000
Note that the development build is not optimized.
To create a production build, use npm run build.
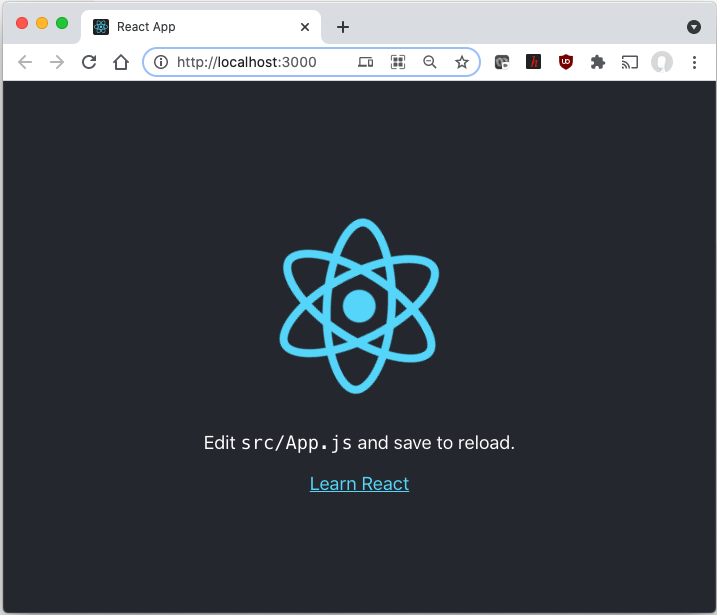
Code language: PHP (php)This will show the following window on http://localhost:3000
React Project Structure and Code Organization
React uses some individual features to build web applications, including:
- One-way data transfer. Properties are passed to the component renderer as HTML tag properties. A component cannot directly change the properties passed to it, but it can change them through callback functions.
- Virtual DOM. React supports virtual DOM and does not rely solely on browser DOM. This allows the library to determine which parts of the DOM have changed compared to the saved version of the virtual DOM. Thus, the programmer works with the page, believing that it is updated, but the library decides which components of the page to update.
- JSX. React components are usually written in JSX. Code written in JSX is compiled into React library method calls. Developers can also write in pure JavaScript. JSX is similar to other languages created by Facebook to expand PHP and XHP.
- React is more than just an HTML rendering tool in the browser. For example, there are dynamic graphics that are rendered in <canvas> tags. In addition, you can use isomorphic loading to render identical HTML on the server and client.
- Life cycle methods. Lifecycle methods are methods embedded using ReactJS. They allow the developer to process data at different points in the lifecycle of React (shouldComponentUpdate, componentWillMount, componentDidMount, WillMount, render).
- Nested elements. Multiple elements at the same level must be wrapped in one container element, such as a <div> element, or rotated as an array.
- Attributes. JSX provides a number of element attributes designed to display those provided in HTML format. Custom attributes can also be passed to a component. All attributes will be obtained by the component as props.
After running npm to create a skeleton of the application, you will have the following React application structure:
In this example index.js file, this is the following JavaScript code:
import React from 'react';
import ReactDOM from 'react-dom';
import './index.css';
import App from './App';
import reportWebVitals from './reportWebVitals';

ReactDOM.render(
  <React.StrictMode>
    <App />
  </React.StrictMode>,
  document.getElementById('root')
);

// If you want to start measuring performance in your app, pass a function
// to log results (for example: reportWebVitals(console.log))
// or send to an analytics endpoint. Learn more: https://bit.ly/CRA-vitals
reportWebVitals();
Code language: JavaScript (javascript)
The App.js file has the following JavaScript code:
import logo from './logo.svg';
import './App.css';

function App() {
  return (
    <div className="App">
      <header className="App-header">
        <img src={logo} className="App-logo" alt="logo" />
        <p>
          Edit <code>src/App.js</code> and save to reload.
        </p>
        <a
          className="App-link"
          href="https://reactjs.org"
          target="_blank"
          rel="noopener noreferrer"
        >
          Learn React
        </a>
      </header>
    </div>
  );
}

export default App;
Code language: JavaScript (javascript)
The App() function in the application uses JSX. JSX may resemble a template language, but with all the benefits of JavaScript. JSX creates "React-components". React leverages the fact that the output logic is related to the other logic of the user interface: how events are processed, how the state changes over time, and how the data is prepared for rendering. Instead of artificially separating technologies by placing markup and logic in separate files, React shares the responsibility between loosely bound units that contain both technologies and are called "components." React does not require the use of JSX, but provides visual assistance when working with the user interface in JavaScript code.
Test Automation for React Application
The App.test.js file consists of the following unit test.
import { render, screen } from '@testing-library/react';
import App from './App';

test('renders learn react link', () => {
  render(<App />);
  const linkElement = screen.getByText(/learn react/i);
  expect(linkElement).toBeInTheDocument();
});
Code language: JavaScript (javascript)
Where expect() allows us to test many unit tests of a given result from an app with expected result. This is a great option to run unit tests directly from the React library, as it makes the testing process simple and keeps the project in good shape at all times.
Example: Getting Data from Weather API to the Web Page
Now, let’s create a very simple React application for getting weather data. We will use OpenweatherAPI for providing weather data. We will get weather data from the New York server. To do that, let’s install openweather-apis from https://www.npmjs.com/package/openweather-apis
npm install openweather-apis
Then, we need to slightly change the source code App.js from the previous example.
import './App.css';
import React, { useState, useEffect } from 'react';

var weather = require('openweather-apis');
weather.setLang('en');
weather.setCity('New York');
// check http://openweathermap.org/appid#get for get the APPID
weather.setAPPID("3...4");

function App() {
  const [ temp, setTemp ] = useState('')
  useEffect(() => {
		weather.getTemperature(function(err, temp){
		console.log(temp);
		setTemp(temp)
   		});
  }, [])

  return (
    <div className="App">
      <header className="App-header">
      <b>Weather API</b>
      <b>New York { temp } C </b>
      </header>
    </div>
  );
}

export default App;
Code language: JavaScript (javascript)
In this example, we will need to set variable temp to the value that we receive from the OpenweatherAPI. To do that, we need to add hooks by using the useState() and useEffect() functions. This will allow us to set variable temp and use it as {temp} in the JSX later on the web page to show the value of temperature. This is necessary because of React’s lifecycle concept for web pages. It seems a slight offbeat, but you will use this approach to make really effective code for your apps.
As you know, hooks are a new addition in React version 16.8. Please read more information about hooks in React’s documentation. It shows the equivalence between hooks and classes. Please take into account that unit testing with useState and useEffect will take some specific attention. So, this application gets value from OpenweatherAPI and shows this on the page:

Advanced Weather Example
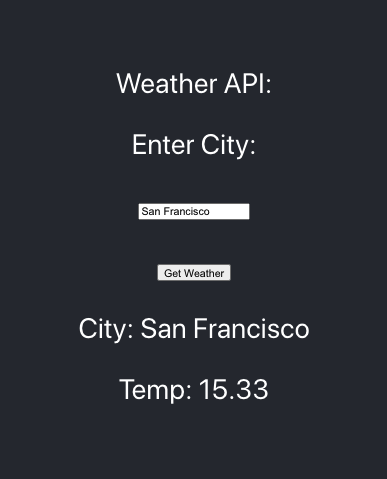
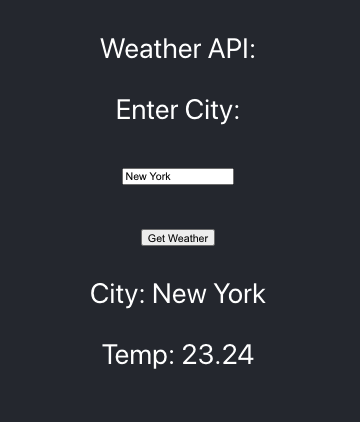
Among other things, React allows you to use an object-oriented model. This helps you write more organized and slender code, which is very important for building user interfaces, especially for web applications. In this example, you will create an App class and inherit from React.Component. In the constructor, you will set the initial position of the city in which you know the weather, in this example, it is New York. Further, according to the lifecycle of a React component, you’ll take the temperature value in the componentDidMount() method.
Now, in this example, you’ll be able to enter the name of the city in which you want to know the weather. To do this, the myChangeHandler() method will be called. When you click on the Submit button, you will request the temperature value in the entered city from the OpenweatherAPI server in the mySubmitHandler() method. Accordingly, in the render() method, use the {this.state.city} and {this.state.temp} variables. At the same time, do not forget to register the actions onChange = {this.myChangeHandler} and onChange = {this.mySubmitHandler} for the input text field and the Submit button, respectively.
import './App.css';
import React from 'react';

var weather = require('openweather-apis');
weather.setLang('en');
// check http://openweathermap.org/appid#get for get the APPID
weather.setAPPID("3...4");

class App extends React.Component {
 constructor(props) {
   super(props);
   this.state = {city: "New York", temp: 21.5};
   weather.setCity(this.state.city);
 }

 componentDidMount() {
   weather.getTemperature(this.myUpdateTemp);
 }

 myChangeHandler = (event) => {
   this.setState({city: event.target.value});
 }

 myUpdateTemp = (err, t) => {
   console.log(this.state.city);
   weather.setCity(this.state.city);
   console.log(t);
   this.setState({temp: t});
 }

 mySubmitHandler = (event) => {
   event.preventDefault();
   weather.getTemperature(this.myUpdateTemp);
 }

 render () {
  return (
   <div className="App">
     <header className="App-header">
     <form onSubmit={this.mySubmitHandler}>
     <p>Weather API:</p>
     <p>Enter City: </p>
     <p>
       <input type="text" value={this.state.city} onChange={this.myChangeHandler} />
     </p>
     <p>
       <input type="submit" value="Get Weather" onChange={this.mySubmitHandler} />
     </p>
     <p>
       City: {this.state.city }
     </p>
     <p>
       Temp: {this.state.temp }
     </p>
     </form>
     </header>
   </div>
 );
 }
}

export default App;
Code language: JavaScript (javascript)
When starting the application, you’ll get a window similar to the one depicted below with the ability to enter the name of the city.
Conclusion
Hey, you made it! We’ve looked at basic examples of the React library to highlight its benefits and potential capabilities. Regardless of React’s reputation of being somewhat complex and confusing, its benefits and advantages cannot be dismissed when it comes to developing applications. If your project requires that you develop a web application, and you want to do it in React, contact our Svitla Systems specialists who are experts in developing projects with high quality and within a reasonable time frame. For example, the task of creating a front-end is, in principle, well suited for outsourcing, and you will immediately experience first-hand the benefits of working with Svitla Systems in the Team Extension Model. In addition, we also offer you solutions for creating a UI / UX, developing a backend, testing and maintaining a project in cloud systems.
Svitla Systems also develops front-end on other frameworks and libraries and provides, in addition, a full-stack service for developing web applications, mobile solutions and high-load cloud solutions.