
Figma was first launched in 2015. By that time, the company funding was raised up to $18 million. The biggest pain point that Figma creators Dylan Field, co-founder, and Evan Wallace, CEO, tried to fix was to provide easy access for designers to collaborate with their teams. The role of the designer became more cross-functional than ever before. Designers took positions in the center of the organizations, and because of this, they needed a way to share assets with other designers, adjust copies for marketing work, make red lines for engineers and collaborate with development teams on a more efficient level. At this point, there was no other tool that could have handled these issues. After six years of growth in design and cloud collaboration, Figma raised its valuation to $2.05 billion. Year over year, this number has continued to improve. So, what makes Figma such a great tool for designing?
In this article I would like to share a few hacks with you for the design flow that I developed using Figma day after day.
First, let’s talk about auto layout components in Figma and what the tool is capable of. To create Auto Layout, you need to create a frame out of any element you designed. For example, a line of text.
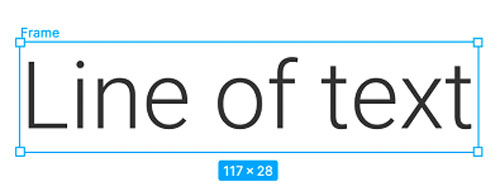
Here, framing works as a container that wraps up the element and can be used for further autolayout Figma properties.
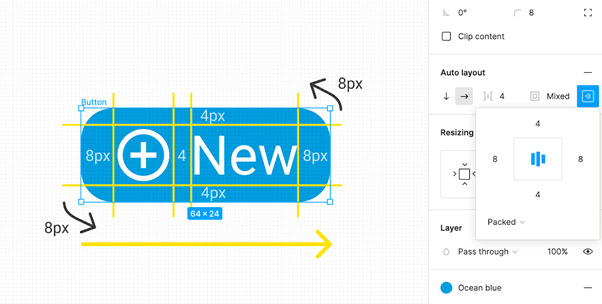
Now, let’s say the line of the text above is a button. After you frame the button and apply Auto Layout, the elements inside are stacked. Now you can move the direction to the right, add corner radius, padding, adjust spacing between an icon and the label text, align elements, fill color, etc. All this is applied to the frame without adding any additional layers!
This is just the beginning! You can also build more complex Figma auto layout components like Lists or Data Tables that adapt as items are added, removed, or hidden.
How to build responsive components with Auto Layout
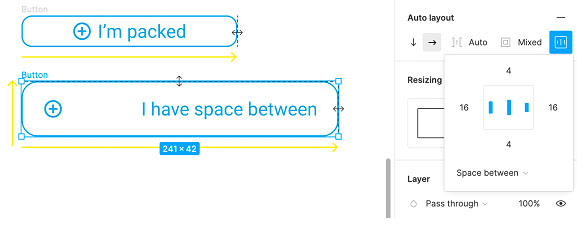
When we talk about using Auto Layout with a component and its responsiveness, we mean that it contains a parent and a child element. Parent element properties affect the child’s behavior. For example, "packed" objects in a frame will be grouped together. You can use this option to keep objects as close as possible and aligned together.
"Space between" objects in a frame will have equal space between them. To grow the button or shrink it, simply drag the component’s edge. The elements inside adapt to its width and height automatically. Resizing can be applied for objects on both the X and Y axis, manually, or in the settings panel.
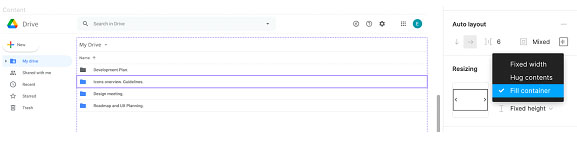
Like we had a parent and a child element inside a single component in the Figma autolayout, a group of components would have the same structure but within the frames. Objects in an Auto Layout frame set to Fill container stretch to the width and/or height of their parent frame. With these properties, you can control each resizing option in a group of components and more parts of the UI pages.
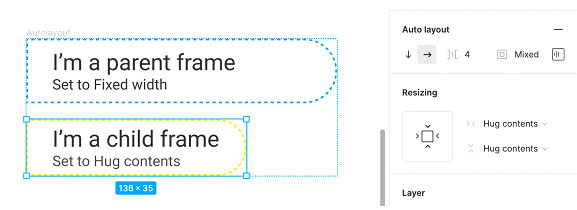
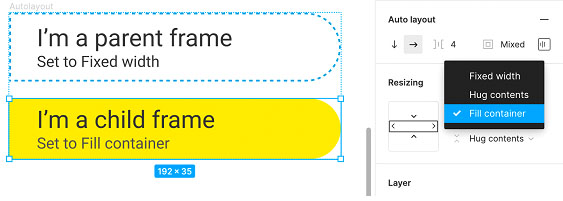
Keep in mind that when you create an Auto Layout with multiple frames, it’s important to set each frame to Fill the container as well (see example below), to make your pages fully responsive.
Atomic approach in design and why it fits the concept of creating Variants in Figma
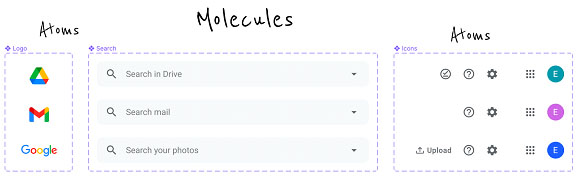
If you use Google Atomic Design, you will definitely read a lot of information that it’s based on the physical world and its five stages, which are atoms, molecules, organisms, templates, and pages. As molecules are split into atoms, atoms represent the smallest HTML elements like labels, inputs, buttons, and more. They cannot be broken down any further without losing their functionality.
Molecules make simple groups of atoms function together as a unit. For example, a form label, a text area, an input, and a button, grouped together into a single molecule.
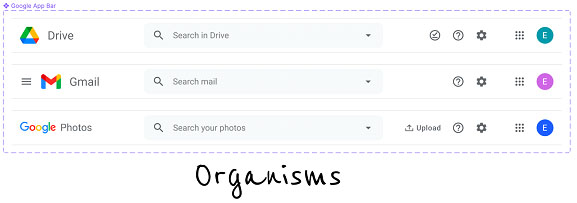
Organisms are UI components made of groups of molecules and/or atoms and/or other organisms. Templates are basically built out of all the parts above in a wireframe style. In other words, templates form cascades of future UI pages. Pages are ready-made design layouts that went through all the stages above.
There are a lot of advantages of using the Atomic Design approach, but I would like to emphasize a few of them:
- By breaking down organisms (design components) into basic atoms, you can change, update, combine, and mix and match easily.
- With Atomic Design, you use consistent components through the whole project, which gives you flexibility to manipulate the content in a fast and productive way.
- When you have a design library with atoms, molecules, and organisms, you can speed up prototype creation.
- Same as with prototyping, it is easier to update parts of the project because you can see modules and the file structure of your project.
How to create variants in Figma? For example let’s create a Google Drive App Bar and break it down into atoms, molecules, and organisms.
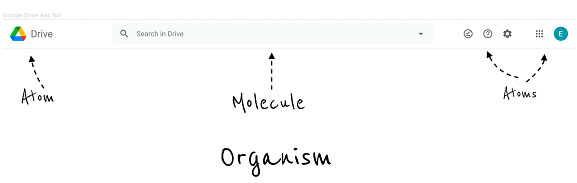
Imagine you want to apply a different set of icons and replace them here or try a different logo. This is where Variants in Figma come very handy. Variants are component groups and their purpose is to give a variety of the same component, keeping it in one place. You can use them with atoms for control states, set states like default, hover, or active. The other way to use the Figma Variants is to change the style or apply different properties in atoms, like color, fill, stroke, etc.
Last but not least, you can simply replace entire pieces of interfaces changing the structure of the designs or different parts of the layout. Let's build a bunch of atoms, molecules, and organisms using Variants in Figma. First, create Figma, then select them, and combine them as Variants.

When you have everything prepared, you can get access to all the variants out of the document local library.

To go even further, you can update the details inside those components. There are a few ways to do that. Either you make changes to the Master component and new properties will be applied to all its instances or work with Variants. In a standard way, you would have to add a new master Figma component to the Variants group, assign specific attributes to it, or create new ones. Realistically, this takes a while, but I’d like to show you a faster way to get it done.
How fast to update, change and fix designs in Figma
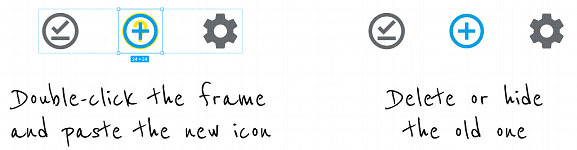
Let’s say you don’t need to create new alternatives because you are happy with what you have until you realize that you missed something. To keep an atom with all its attributes but only change the content, click cmd+X inside a frame with the new content, double-click the frame inside a Variant, and paste the new content. Now, you can delete the old content and save all properties with the updates inside. In the long run, you can save a lot of time and speed up the design work process.
Creating whole interfaces that are flexible and can be adapted to different screen sizes on the fly
Now that you have all the organisms ready on the page, you need to check if they are set to Fill container (as discussed previously in this post). Let’s adapt organisms to different screen sizes.
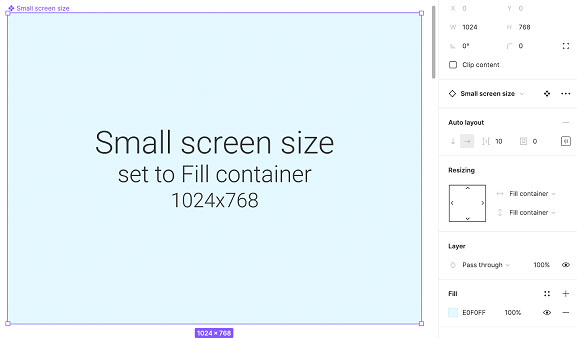
Let’s say we have Small, Large, and Extra-Large screens. The breakpoints for them would be 1024x768px, 1440x900px, 1920x1080px. You will need to have 3 Auto Layout screens which are Variants and each one contains an Auto Layout frame inside set to Fill container, for both width and height.
Now, all you have to do is select the needed page out of the list in the right panel. In this example, it’s a Google Drive page.
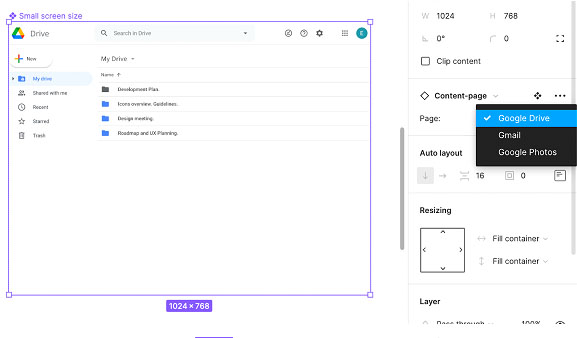
It will adapt to the smallest screen size and all the UI components are completely flexible! The layout components extend and shrink even if the breakpoint is floating.
Conclusion
Figma has become one of the most popular tools for team collaboration and design. To take the workflow to a whole different level, you need to employ specific techniques like Groups, Constraints, Auto Layout, Variants, etc. When effectively combined, these can help you save tons of time and resources. For instance, it’s very helpful to deal with the Figma list component, data tables, buttons, icons, etc. Designers, rejoice!
Svitla Systems experienced designers and UX/UI developers have a great level of understanding and practical expertise in creating large projects with tools like Figma. If you need to develop your project from scratch or rebuild an existing project, please contact Svitla Systems representatives in your area.